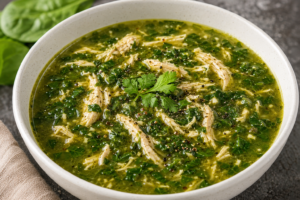
Healthy Palak Chicken Soup (Weight Loss Friendly)🍗🥣

High-Protein | Low-Carb | Easy to Make | Ready in 30 Minutes

🥣 Introduction

A healthy, filling meal that aids your weight-reduction efforts? Well, this healthy palak chicken soup has it all. Lean protein, iron-rich spinach, and other healthy ingredients go into this low-carb, high-protein, and super easy-to-make dish. It will leave you feeling full for a long time after your lunch or dinner.

⏱️ Preparing Time:

 Prep: 15 minutes

Cook: 20 minutes

Total: 35 min

Servings: 2

🛒 Ingredients

Main ingredients:

  • 250 g chicken breast, boneless
  • 3 cups spinach, palak, chopped
  • 1 tbsp desi ghee
  • 5 garlic cloves, chopped
  • 1 in. ginger, chopped/grated
  • 3 cups bone broth/water
  • ½ tsp freshly ground black pepper
  • ½ tsp himalayan salt, or to taste

Optional ingredients:

  • ¼ tsp. turmeric powder
  • ¼ tsp. roasted cumin powder
  • ½ tsp. lemon juice
  • fresh coriander leaves, to garnish

👨‍🍳 How to Cook

Step 1: Preparing the ingredients

  • Wash the spinach properly in running water.
  • Chop the spinach into roughly equal-sized pieces.
  • Chop the garlic and ginger finely.
  • Remove the fat from the chicken breast if it is not already done. Cut the chicken into small cubes. Use fresh raw chicken if possible.

Tip: Use fresh spinach for a healthier and tastier soup.

Step 2: Cooking the chicken

  • In a soup pot, bring 3 cups of either water or bone broth to a gentle boil.
  • Add the chicken breast and let it cook for 1215 minutes, or until it is done.
  • Remove the chicken and let it cool a bit. 
  • Then, use two forks to shred the chicken into tiny pieces.
  • Keep some of the soup broth for later use.

Tip: You can cook the chicken in the soup to enhance its flavor.

Step 3: Cooking garlic and ginger

  • Heat 1 tbsp. of desi ghee in a soup pot over medium heat.
  • Add chopped garlic and cook for 1 min or until it turns a golden color.
  • Add chopped ginger and stir for another 3040 sec, until it becomes aromatic.

 Make sure you do not burn the garlic.

Step 4: Cooking the spinach

  • Add chopped spinach to the pot and continuously stir for 3-4 min.
  • The chopped leaves will start to wilt and shrink in volume. 

If you want to add turmeric powder, do it now.

Step 5: Blending (optional)

  • Once done, you can let the spinach mixture cool down a bit and blend it with ½ cup of the soup broth to your desired consistency.
  • If you want to keep the texture chunky, skip this step.

Step 6: Finishing the soup

  • Return the blended mixture (or the cooked spinach) to the pot and add the remaining soup broth. Then, add the shredded chicken and let everything simmer together for 5-7 minutes. 
  • Do not let the soup boil.

Step 7: Seasoning

  • Add ½ tsp himalayan salt to the soup.
  • Sprinkle freshly ground pepper over the soup.
  • Add roasted cumin powder if you want. Mix everything together and taste the soup. 
  • Then, add seasonings to your liking.

Step 8: Garnishing and serving

  • Turn off the heat and add a few drops of lemon juice.
  •  Then, garnish the soup with coriander leaves. Serve the soup hot. 
  • Add a few pieces of shredded chicken on top to increase your protein intake if you want.

🌿 Health Benefits

Chicken is an excellent source of high-quality protein. Spinach contains iron, folate, vitamin A, vitamin C, and antioxidants. Garlic and ginger give this dish unique flavors and aroma. It is low in carbs, which makes it ideal for a variety of low-carb diets that promote weight loss. This soup is filling and has a good amount of nutrients, making it a healthy option for your daily meals.Everyone interested in maintaining a healthy lifestyle may want to try this soup. It is good for people who want to lose weight since it has healthy ingredients and is low in carbs. 

🍽️ How to Serve This Soup

You can serve this soup with a salad for a fulfilling and healthy meal. Since it is a relatively light dish, you can eat it for  dinner. To store the soup, you can put it in an airtight container in the fridge for up to 3 days. Reheat it over a low flame when needed.


Conclusion🍲

Palak chicken soup is a high-protein, low-carb, healthy, and delicious dish made of chicken and spinach. It will suit everyone who wants to lose weight, be healthier, or simply follow a high-protein diet. This soup is easy to make and goes well with an active and healthy lifestyle.


Healthy Paneer “Poha” with Lots of Vegetables (No-Poha Version with Almonds)

A Healthy Alternative to Flattened Rice Poha

Do you love the taste of poha but desire a healthier, proteinrich alternative with more vegetables? This Healthy Paneer “Poha” (No-Poha version) is a delicious option made with crumbled paneer instead of flattened rice that gives this popular dish its fluffy texture. Paneer in this recipe provides you with lots of healthy proteins while fresh vegetables add fiber, vitamins, and colors. Almonds add crunch and healthy fats. Healthy paneer poha is a great healthy option for breakfast, lunch, or dinner.

A Healthier Paneer Poha Option You Will Love

  • Loads of healthy proteins from paneer
  • Crunchy and healthy almonds
  • Fiber, vitamins, and minerals from vegetables
  • Light, no-flour, gluten-free
  • Perfect for a quick meal – takes only 20 minutes to make
  • Protein-rich for muscle gain and repair
  • Great for kids and adults
  • Easy to prepare, no artificial additives

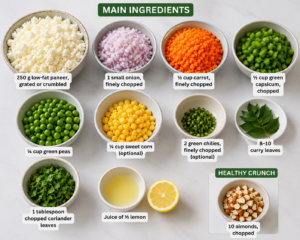
Ingredients for Healthy Paneer “Poha” with Lots of Vegetables (No-Poha Version) (Serves: 2)

Main ingredients

  • 250 g of low-fat paneer, grated or crumbled into small cubes
  • 1 small onion, finely chopped
  • ½ cup of carrots, finely chopped
  • ½ cup of green capsicum, chopped
  • ¼ cup of green peas
  • ¼ cup of sweet corn (optional)
  • 2 green chilies, finely chopped (optional)
  • 8-10 curry leaves
  • 1 tbsp chopped coriander leaves
  • Juice of ½ lemon

Healthy crunch

  • 10 almonds, chopped


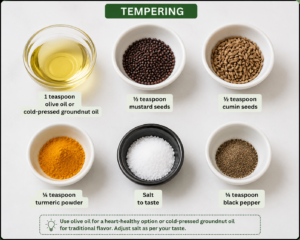
Tempering ingredients

  • 1 tsp olive oil or cold-pressed groundnut oil
  • ½ tsp mustard seeds
  • ½ tsp cumin seeds
  • ¼ tsp turmeric powder
  • Salt to taste
  • ¼ tsp black pepper

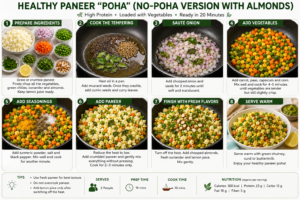
Step by step Healthy Paneer “Poha” with Lots of Vegetables:

Step 1: Prepare ingredients for healthy paneer poha

Chop all the vegetables, finely chop the onion, carrot, capsicum, coriander, and green chilies. Grate or crumble paneer until it reaches the consistency of poha. Chop the almonds into small cubes. The finer you grate paneer, the closer it will resemble traditional poha.

Step 2: Cook healthy vegetable mixture for paneer poha

Heat oil in a non-stick pan, add mustard seeds. When they start to crackle, add cumin seeds and curry leaves. Add onions and sauté for 2 minutes until they are soft. Add carrots, peas, capsicum, and corn. Mix well and cook for 4-5 minutes until the vegetables are tender but still crisp.

Step 3: Add tempering spices and cook healthy paneer poha

Sprinkle turmeric, black pepper, and salt. Mix well and cook for one more minute until the spices release their aroma. Add the finely grated paneer to the pan with vegetables.

Step 4: Cook paneer with vegetables

Reduce the heat to low and gently mix paneer and vegetables. Do not crush the paneer; let it retain its shape to resemble poha. Cook for 2-3 minutes. Paneer should not be overdone; it should remain tender.

Step 5: Add fresh coriander, lemon juice, and almonds

Turn off the heat and add fresh coriander leaves, lemon juice, and chopped almonds. Mix everything together.

Serving suggestions

Serve healthy paneer poha with:

  • fresh cucumber slices
  • mint yogurt dip
  • green chutney
  • buttermilk

Health benefits of healthy paneer poha recipe

Excellent source of healthy proteins

Paneer contains lots of proteins beneficial for muscle gain and repair. This dish is a healthy high-protein option and keeps you full for a longer time.

Loads of vitamins and minerals

Carrots, capsicum, peas, and coriander are packed with vitamins and minerals.

Healthy weight loss option

Due to the high protein content, this dish helps you feel full for a longer time; therefore, it can be used for healthy weight loss.

Heart-healthy fats

Almonds in this recipe are a source of healthy fats, vitamin E, magnesium, and other nutrients needed for heart health.

Blood sugar levels Control

Compared to traditional poha made of flattened rice, this healthy paneer poha option has fewer carbohydrates and is healthier for blood sugar control.

Expert nutritionist tips

  1. Use fresh paneer for this recipe to obtain the best consistency and taste.
  2. Add spinach or mushrooms if you want extra healthy options.
  3. You can toast almonds before adding them to this dish for extra flavor.
  4. Add lemon juice only after turning off the heat.
  5. Avoid overcooking paneer in this recipe to retain its soft consistency.

Delicious stir-fry with vibrant bell peppers and fresh ingredients in a cooking pan.

Final thoughts

Healthy Paneer “Poha” with Lots of Vegetables (No-Poha Version with Almonds) shows that you can enjoy healthy meals without sacrificing taste. With healthy proteins from paneer, loads of vegetables, wholesome almonds, and spices, this dish is a great alternative to traditional poha made of flattened rice. With the right portion sizes and an active lifestyle, this recipe can become part of your healthy eating plan for weight loss or general health improvement.


Build Strength Anytime, Anywhere with One of the World’s Best Bodyweight Exercises

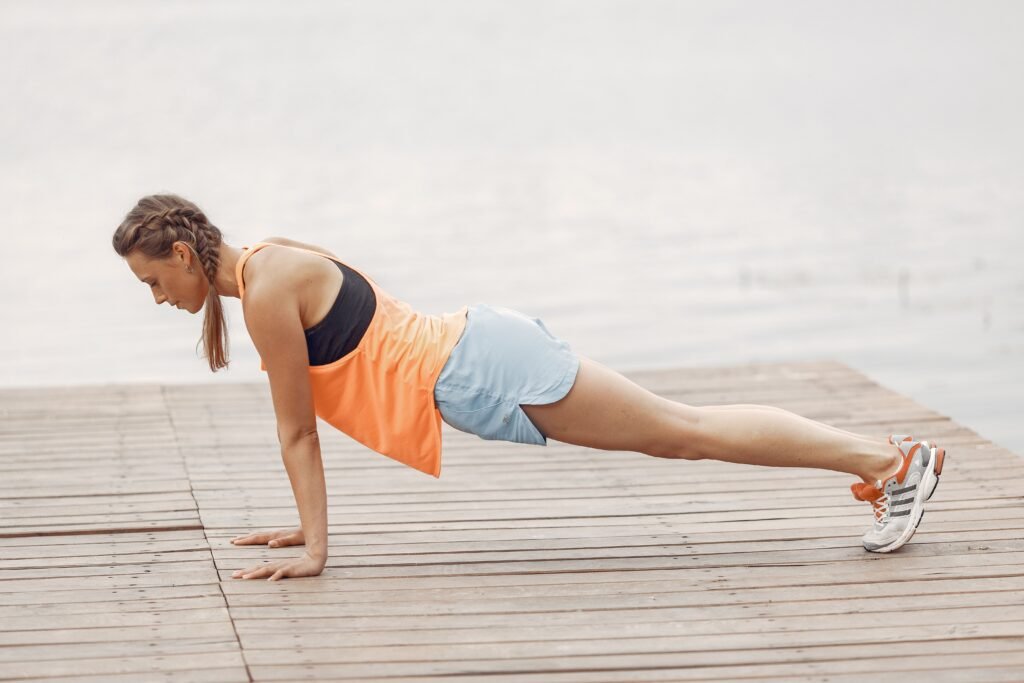
Think about the possibility of developing and improving your body without spending a fortune on expensive machines at a gym. This is precisely why push-ups have continued to remain popular for many years. Regardless of whether someone is a complete novice trying to get into shape or an experienced fitness buff looking to meet their daily workouts, it is possible to achieve their goals through push-ups.
All that is needed is to do them correctly and to use a suitable variation to challenge the body.
Push-ups are a functional exercise that allows people to achieve a wide variety of fitness objectives. They require nothing but one’s own body weight and a small amount of space to perform. Developing the correct technique and using progressive overload when doing push-ups can have numerous health benefits, including improved posture, core strength, upper body strength, and increased stamina. Therefore, in this paper, the benefits of doing push-ups will be discussed, and the reader will learn how to do them right, what variations are available, and at what age they should start.

What Are Push-Ups? Description

Push-up is a bodyweight exercise that involves lowering and raising one’s body using the upper limbs while maintaining the body in a straight line. This exercise is a compound movement, which means it works several muscle groups at once.
The push-up is a versatile exercise that can be done anywhere and does not require any equipment, making it an accessible option for people who do not have access to a fully equipped fitness center.


Why Are Push-ups So Effective?

Push-ups are so effective because they work multiple muscle groups at the same time.

The main muscles that are being worked are:

  • Chest (Pectoral muscles)
  • Shoulders (Deltoids)
  • Triceps
  • Core muscles
  • Upper back stabilizers

Since multiple muscle groups are being worked, push-ups are also an excellent exercise for coordination, balance, and core strength.


Top Benefits of Push Up Essay

  1. Build Upper Body Strength

It is a great exercise to develop pectorals, shoulders, and arms. It improves muscular endurance and power in a natural way because it works out those muscles.

  1. Work Your Core Muscles

During push-ups, people tend to focus mostly on their chest, arms, and shoulders, but they are actually working out their abdominal muscles, lower back, and hip muscles.

It is essential to hold the correct push-up position in order to engage your abs, glutes, and lower back throughout the movement.

  1. Improve Posture

The majority of the population leads a sedentary lifestyle and spends too much time sitting. Push-ups help to strengthen the muscles that are responsible for keeping your spine straight and prevent slouching.

  1. Increase Bone Density and Joint Stability

The push-up is a weight-bearing exercise. This is critical for enhancing bone density, preventing osteoporosis, and supporting healthy joints. Moreover, if properly executed, push-ups will reduce pressure on the wrists and knees.

  1. Help Lose Weight

This exercise enables you to burn a significant number of calories per hour and build muscle mass simultaneously. Increased muscle will enable your body to consume more calories even when you are sedentary.

When used in combination with proper nutrition and other forms of physical activity, push-ups can help you achieve your goal of losing excess weight.

  1. Enhance Athletic Performance and Daily Functional Abilities

Push-ups are helpful in everyday life because they allow people to perform regular tasks with greater ease and efficiency. For example, lifting bags at the supermarket, carrying children, pushing shopping carts, or sliding across doorways will become much easier after a proper push-up regimen.

  1. Easy to Perform and Accessible Everywhere

There are no equipment needed for doing push-ups. Therefore, they are a convenient exercise for people with a busy schedule who find it hard to visit the gym or buy weights. Push-ups can be done anywhere, even at home. All that is needed is a flat surface to stand/sit and a minute or two to spare.


Correct Push-up Form

When performing push-ups, the emphasis must be placed on the quality of each repetition rather than the quantity of repetitions

Here are some tips for performing push-ups:

Step 1

the person should place their hands slightly more than shoulder width apart.

Step 2

they need to ensure that their body forms a straight line from the head to the heels.

The person must avoid sagging hips or lifting the hips up too high.

Step 3

tightening of the muscles in the core and glutes is important.

Step 4

the person needs to lower their body down towards the floor until their chest is almost touching the floor while keeping their elbows at around 45 degrees.

They should then push themselves back up until their arms are fully extended.

The push-up should be repeated in this manner.

Common Mistakes To Avoid When Doing Push-ups

The following are some of the common mistakes that people make when doing push-ups:

  • Sagging hips
  • Lifting the hips up high
  • Flaring of the elbows
  • Looking up too much
  • Performing the repetitions too quickly
  • Not completing a full range of motion during the repetitions

Push-up Variations

For people of all fitness levels, there are several variations of push-ups as described below:

Wall Push-ups: This is the easiest variation and is highly recommended for senior citizens, elderly people and for those just starting their fitness journey. With this variation, the body weight is significantly reduced since the upper body is supported by the wall.

Incline Push-ups: This is another easy variation for beginners. The person places their hands on an incline surface such as a bench or a table.

Knee Push-ups : As the name suggests, this variation is performed on the knees. It is suitable for beginners.

Standard Push-ups: This is the most common variation and is perfect for the average fitness enthusiast.

Wide Push-ups: This variation is similar to the standard push-up, except that the hands are placed wider than the shoulder width. This variation targets the chest muscles.

Diamond Push-ups: This variation is characterized by the fact that the hands are placed together in a diamond shape underneath the chest, targeting the triceps.

Decline Push-ups: This variation is slightly more difficult than the standard push-up. The feet are elevated on an incline surface.

Plyometric Push-ups: The hands leave the floor during this advanced variation, requiring explosive power. This variation should only be attempted by people who are already very good at doing standard push-ups.

How Many Push-ups Per Day?

The number of push-ups depends on the individual’s fitness level.

Beginners

should aim for 5-10 push-ups with 2-3 sets 3 times weekly.

Intermediate

fitness enthusiasts need to do 10-20 push-ups with 3-4 sets per day.

Advanced

fitness enthusiasts need to do 20-40+ repetitions with multiple sets per day.

Age Group And Push-ups

Push-ups are ideal for people of all ages, as long as the variation is selected according to the fitness level and ability of the individual.

Children (6-12 Years)

For this age group, having fun is the key priority while learning the correct form. Wall push-ups and knee push-ups are most appropriate for this age group.

Teenagers (13-17 Years)

With this age group, it is safe and recommendable to do standard push-ups as long as the correct technique is adhered to. For teenagers, the focus should be on building muscle mass without overtraining.

Adults (18-60 Years)

All push-up variations can be done by this age group as long as the correct form is maintained. Adults should aim for two to four sets of push-ups, with the intensity and frequency depending on the individual fitness level.

Senior Citizens (60+ Years)

Senior citizens should consider doing incline push-ups or wall push-ups, as these variations are easier on the joints. In terms of the frequency, it is recommendable for seniors to do push-ups 2-4 times a week, leaving at least a day in between each session.                                                                                                                                                         For people with heart conditions, high blood pressure, severe arthritis or those who have been through major surgery, it is important to speak with a doctor before starting to do push-ups.


Real-Life Example

Rahul was a 35-year-old office worker who spent almost eight hours sitting at his desk, leading him to develop poor posture and stiff shoulders. He did not have the time to go to the gym. As a beginner, Rahul started by doing five incline push-ups each morning. After three months, he had progressed to doing three sets of 15 standard push-ups. In addition to walking and eating healthy, Rahul had significantly improved his upper body, posture, energy levels and self-confidence. Doing just five push-ups per day helped him achieve these amazing results.

Expert Tips

It is useful to warm-up for 5-10 minutes before doing push-ups. Another tip is to focus on slow and controlled movements and to breathe in while lowering the body and breathe out while raising the body back up to the starting position. In addition, at least one day should be allowed for rest in between days of doing push-ups. It is also recommendable to combine push-ups with other types of exercises for better results. Eating healthy foods and drinking plenty of water is also important for optimal health and to ensure that the body has the energy to perform the exercises.

Frequently Asked Questions

Can a beginner do push-ups?

The answer is yes. A beginner can either start with the wall push-up, incline push-ups, or knee push-ups before progressing to the standard push-up.

Are push-ups enough to build muscle?

Push-ups are perfect for building muscle, especially for beginners. As one progresses and gains strength, more challenging push-up variations can be incorporated to continue building muscle.

Should I do push-ups every day?

While it is possible to do push-ups every day, it is not always necessary. It is better to allow the body to rest for a day or two in between each day of doing push-ups.

Do push-ups help in weight loss?

Push-ups can aid in weight loss since they help to build lean muscle mass, which in turn increases the metabolic rate. To lose weight, it is important to combine push-ups with a healthy diet and other physical activities.

Final Remarks

Push-ups are one of the best types of exercises, as they can be performed by people of all ages and skill levels. Even though this page has highlighted all the push-up variations for different age groups, it is important to remember that the fitness journey requires consistency, patience and the determination to keep going. Focus should be placed on the quality and not the quantity of repetitions.


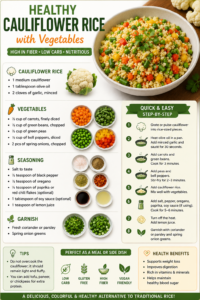
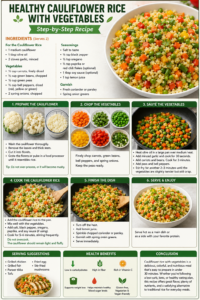
Healthy Cauliflower Rice with Vegetables (Step-by-Step Recipe) 🥦

Introduction

Cauliflower rice with vegetables is a healthy, low-carb, and high-nutrient dish. This dish is perfect for people on a diet, especially for those with diabetes. Besides, it is a quick and easy recipe that can be prepared in one hour for lunch or dinner.

Ingredients (2 Servings)

Cauliflower rice

  • 1 medium cauliflower
  • 1 tablespoon olive oil
  • 2 cloves of garlic, minced

Vegetables

  • ½ cup of carrots, finely diced
  • ½ cup of green beans, chopped
  • ½ cup of green peas
  • ½ cup of bell peppers, diced
  • 2 pcs of spring onions, chopped

Seasoning

  • Salt to taste
  • ½ teaspoon of black pepper
  • ½ teaspoon of oregano
  • ½ teaspoon of paprika or red chili flakes (optional)
  • 1 tablespoon of soy sauce (optional)
  • 1 teaspoon of lemon juice

Garnish

  • Fresh coriander or parsley
  • Spring onion greens

Step-by-Step Recipe:

👩‍🍳 Step 1: Prepare the Cauliflower

  1. Wash the cauliflower thoroughly and cut off the leaves and thick stem.
  2. Cut the cauliflower into florets and grate them on a box grater or pulse in a food processor until it reaches a rice consistency.
  3. Make sure not to over-process it, or it will turn out mushy.

🥕 Step 2: Chop the Vegetables

  1. Chop the carrots, green beans, bell peppers, and spring onions into small pieces.
  2. Keep the peas on the side.

🔥 Step 3: Sauté the Vegetables

  1. Heat some olive oil in a large pan over medium heat.
  2. Add the chopped garlic and sauté for 30 seconds.
  3. Add the carrots and beans and cook for 3 minutes.
  4. Then add the peas and bell peppers.
  5. Stir-fry for another 2-3 minutes until the vegetables are tender but still crisp.

🍚 Step 4: Cook the Cauliflower Rice

  1. Add cauliflower rice to the pan with the vegetables and stir fry everything together.
  2. Add salt, black pepper, oregano, paprika, and soy sauce.
  3. Cook everything for 5-6 minutes until the cauliflower is tender but still light and fluffy.
  4. Do not overcook it, or it will turn out mushy.

🍋 Step 5: Finish the Dish

  1. Turn off the heat and add lemon juice.
  2. Then add chopped coriander or parsley and spring onion greens.
  3. Your healthy and delicious cauliflower fried rice is ready to be served.

Health benefits

Cauliflower rice with vegetables is low in carbohydrates, high in fiber, and packed with vitamin C. It helps to lose weight, reduces the risk of diabetes, and keeps the blood sugar level stable. This dish is gluten-free and vegan-friendly.

Conclusion 

Cauliflower rice with vegetables is a healthy and easy-to-make dish that can be prepared in less than an hour. It is a perfect low-carb, keto, or diabetic-friendly dish that will suit anyone’s taste. This dish is full of vitamins and fiber and can be a great alternative to regular rice for every day of the week.


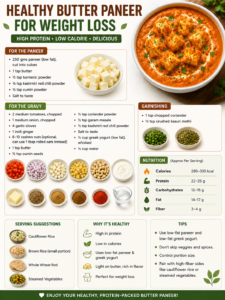
Healthy Butter Paneer for Weight Loss (Step-by-Step Recipe) 🧈

Introduction

Do you love eating butter paneer but cannot have it because it is not healthy? This healthy butter paneer recipe for weight loss is high in protein and low in calories. You can have this delicious butter paneer recipe with low-fat paneer and use less butter. It also uses a cream of yogurt gravy instead of the typical cream that is used to make the traditional butter paneer.

Ingredients (Serves 2)

For the Paneer

  • 250 gms paneer (low fat), cut into cubes
  • 1 tsp butter
  • ½ tsp turmeric powder
  • ½ tsp kashmiri red chili powder
  • ½ tsp cumin powder
  • Salt to taste

For the gravy

  • 2 medium tomatoes, chopped
  • 1 medium onion, chopped
  • 4 garlic cloves
  • 1 inch ginger
  • 8-10 cashew nuts (optional, can use 1 tbsp rolled oats instead)
  • 1 tsp butter
  • ½ tsp cumin seeds
  • ½ tsp coriander powder
  • ½ tsp garam masala
  • ½ tsp kashmiri red chili powder
  • Salt to taste
  • ½ cup greek yogurt (low fat), whisked
  • ½ cup water

Garnishing

  • 1 tsp chopped coriander
  • ½ tsp crushed kasuri methi

Step-by-Step Recipe:

Step 1: Preparing the paneer

Cut the low-fat paneer into cubes. Mix it with turmeric, chili powder, cumin powder, and salt. Keep it aside for 10 minutes.

Step 2: Cooking paneer

Take 1 tsp of butter in a non-stick pan. Add the paneer cubes to it and cook for 1-2 mins on both sides. Keep the cooked paneer aside.

Step 3: Cooking the gravy

In the same pan, add 1 tsp of butter. Add cumin seeds to it and let it split. Add the chopped onion, garlic, and ginger to it. Cook it for 4-5 mins till the onions are tender. Add chopped tomatoes and cashews to it. Cook for 8-10 mins till the tomatoes are soft.

Step 4: Grinding the gravy

Once the tomatoes are soft, turn off the heat. Blend the mixture into a thick smooth gravy. If it is thick add some water to it.

Curry step 5: Making curry

Add the blended gravy to the pan. Add coriander powder, garam masala, kashmiri red chili powder, and salt to it. Cook for 3-4 mins on a low flame. Add whisked greek yogurt to it and give it a good mix. Also, add water to it. Mix well.

Step 6: Adding paneer to the curry

Add the cooked paneer cubes to the gravy. Cook for 4-5 mins on a low flame so that it absorbs the flavors well.

Step 7: Garnishing

Crush kasuri methi in between your palms and add it to the curry. Garnish it with fresh coriander.

🌟 Why this recipe is healthy for weight loss:


High in protein to keep you full for longer.

Made with low-fat paneer instead of regular paneer.

Used low-fat Greek yogurt instead of heavy cream.

Very little butter has been used.

Lots of tomatoes, onions, and spices to add flavor without extra calories.

📝 Conclusion

This healthy butter paneer recipe is the perfect way to enjoy flavorful Indian food while on a weight loss journey. By using high-protein paneer, lighter gravies, and minimal amounts of butter, you can indulge in this delightful dish without derailing your diet. Pair it with some cauliflower rice or whole wheat roti for a wholesome and satisfying meal.

Every Step You Take Is an Investment in Your Health

What if one of the best workouts of all time required no expensive gym membership or fancy equipment, but still helped you achieve the same goal?

That workout is called walking.

The activity of walking is not only simple, but it is also a natural ability that almost everyone possesses. It is beneficial for both adults and children whether you’re going for a short walk or a long one. Walking has been known to lower risk of heart disease, it can improve balance and muscle tone, it can relieve stress, and help you get the right amount of exercise you need to be healthy.

In our modern world, we sit for long periods of time in an office, at school, or home. Lack of exercise can lead to health issues such as: obesity, heart disease, type 2 diabetes, and mental illnesses. The good news is that if you start to exercise regularly, most of these can either prevent or reduce the effects of these dangers.

If you want to lose weight, live longer, and feel better about yourself, you can do so by just walking.

Why Walking Is So Important

Walking is more than just moving from one place to another. It is a full-body activity that benefits nearly every organ in your body.

Regular walking helps:

  • Improve heart health
  • Strengthen muscles and bones
  • Burn calories naturally
  • Improve blood circulation
  • Control blood sugar levels
  • Reduce stress and anxiety
  • Improve sleep quality
  • Boost energy levels
  • Enhance memory and concentration
  • Increase overall life expectancy

The best part is that walking is a low-impact exercise, making it suitable for people of different fitness levels.


The Science Behind Walking

Walking enhances your heart’s efficiency, improving blood circulation and delivering more oxygen to your body. It strengthens muscles, boosts lung function, and triggers the brain to release endorphins and other mood-enhancing chemicals.
Consistent walking contributes to healthier cholesterol levels by reducing LDL and raising HDL, while also helping to maintain stable blood pressure and better insulin response.
With time, these benefits collectively lower the likelihood of developing long-term health conditions.


Top Health Benefits of Walking

1. Supports Heart Health

Regular walking helps strengthen the heart, enhance blood flow, and support stable blood pressure levels.

Individuals who walk consistently tend to have a reduced likelihood of developing heart disease or experiencing a stroke.

2. Helps with Weight Management

It helps burn calories without putting too much strain on your joints, and when combined with a healthy diet, it helps you to lose weight effectively.

3. Improves Mental Health

Walking outside in the open air can help reduce stress levels in your body. It raises the level of serotonin and endorphins in your brain, making you feel better. And many people will tell you that a walk as short as 30 minutes can do wonders for your mood.

4. Strengthens Bones and Muscles

Walking is a weight-bearing exercise that helps improve bone density and reduces the risk of osteoporosis.

It also strengthens your legs, hips, and core muscles.

5. Improves Blood Sugar

Walking after meals helps your body use glucose more efficiently.

This is especially beneficial for people trying to manage blood sugar levels.

6. Boosts Immunity

When people get enough walking, they miss out on fewer seasonal illnesses. That is because moderate exercise, such as walking, boosts the body’s ability to resist infection.

7. Improves Sleep

When you go to bed every night, a routine walk improves your body clock and allows you to get better rest.

8. Enhances Brain Function

Walking supplies the brain with more blood flow, which improves the brain’s memory, focus, creativity, and ability to learn. It has also been shown to prevent age-related mental decline.

How Many Steps Should You Walk Daily?

The popular goal of 10,000 steps is a good aim, but it’s far from the only healthy goal out thereStudies have found that you actually start getting the most crucial health benefits long before you hit 10,000 steps.

Here are some healthier daily step goals:

Age Group                                    Recommended Daily Steps
Children (5–12 years)                                          10,000–14,000 steps
Teenagers (13–17 years)                                           8,000–12,000 steps
Adults (18–64 years)                                         7,000–10,000+ steps
Older Adults (65+ years)          6,000–8,000 steps (or as comfortable)

Remember: If you’re currently walking only 2,000–3,000 steps a day, don’t worry. Gradually increase your daily steps by 500–1,000 every week until walking becomes a natural habit.

When Is the Best Time to Walk?

The best time to walk is the time you can do consistently. However, different times of the day offer different benefits.

Morning Walk

Benefits:

  • Fresh air
  • Better mood throughout the day
  • Increased energy
  • Helps build a consistent routine
  • Supports weight management

Afternoon Walk

Benefits:

  • Relieves work-related stress
  • Improves concentration
  • Reduces stiffness from prolonged sitting

Evening Walk

Benefits:

  • Helps digestion after dinner
  • Relieves stress
  • Promotes better sleep
  • Gives quality family time

Should You Walk Before or After Meals?

Both have advantages.

Before meals

  • May help burn stored fat
  • Can improve metabolism

After meals

  • Supports digestion
  • Helps control blood sugar
  • Reduces post-meal fatigue

Even a gentle 10–20 minute walk after eating can make a noticeable difference.


Walking for Weight Loss

Walking alone won’t magically melt away body fat, but when paired with healthy nutrition, it becomes a powerful tool.

For weight loss:

  • Walk 30–60 minutes daily.
  • Maintain a brisk pace.
  • Stay hydrated.
  • Eat a balanced, protein-rich diet.
  • Aim for consistency rather than perfection.

Walking Tips for Beginners

If you’re just starting:

  • Wear comfortable walking shoes.
  • Start with 10–15 minutes.
  • Increase your time gradually.
  • Walk at a pace where you can talk but not sing.
  • Keep your shoulders relaxed.
  • Swing your arms naturally.
  • Stay hydrated.
  • Warm up before walking and stretch afterward.

Common Walking Mistakes to Avoid

Many beginners unknowingly make mistakes that reduce the benefits of walking.

Avoid:

  • Walking with poor posture
  • Wearing uncomfortable footwear
  • Walking too fast too soon
  • Skipping warm-up exercises
  • Looking down constantly at your phone
  • Ignoring pain or discomfort
  • Being inconsistent

Remember, consistency matters more than speed.


A Real-Life Example

Rita is a 42-year-old office worker. She spends most of her time sitting in a daze. She was unhappy with her unhealthy lifestyle and wanted to change but could not imagine putting herself through a strenuous exercise regime. Therefore, instead of subjecting herself to a rigorous fitness regime, Rita decided to start with something simple and achievable. Every evening, after work, she walked for twenty minutes. After three months, Rita was walking about eight thousand steps a day on average. She had more energy, better sleep, lost weight, and was generally less stressed. Her physician was also impressed with her improved blood pressure and overall fitness.


How to Stay Motivated

Building a walking habit is easier when you make it enjoyable.

Try these ideas:

  • Walk with family or friends.
  • Listen to music or podcasts.
  • Explore different parks or neighborhoods.
  • Track your steps using a fitness watch or smartphone.
  • Set weekly goals.
  • Celebrate small achievements.

Every step counts.


Frequently Asked Questions


Is walking better than running?

Walking is easier on the joints and suitable for most people. Running burns more calories in less time, but walking is often easier to maintain consistently.

How long should I walk daily?

Aim for at least 30 minutes of moderate walking on most days of the week. Even shorter sessions add up.

Can walking reduce belly fat?

Walking helps reduce overall body fat when combined with a balanced diet and a calorie deficit. Spot reduction is not possible.

Do I need 10,000 steps every day?

No. Many health benefits begin around 7,000–8,000 steps per day for adults. The best goal is one you can maintain consistently.

Final Thoughts: One Step Today, A Healthier Tomorrow

Walking is a wonderful way to improve your life. It is a great exercise that will help you get healthier and happier. When you walk it gets your heart pumping, it helps clear your mind, and it builds your fitness, all of those things will lead you to a better life.
You need not be perfect, and you need not strive for ten thousand steps a day, all that matters is that you make those first steps and keep going. Whether it be walking in a nice path at sunrise, taking a walk home from the store, or walking during your lunch break; these things all will improve your physical and mental health.
So take those first steps today, walk at your own pace, and build a habit that will change your life, for all great journeys begin with a single step.


Introduction

Vatican City is the religious and spiritual center of the Roman Catholic Church and, for many, one of the holiest places in Christianity. Despite being the world’s smallest state, it plays a significant role in Christianity for hundreds of years. It is located in the city of Rome in Italy. It is the Holy See of the Pope, who rules the Vatican City as the successor of St. Peter. Throughout more than two millennia, Vatican City has provided shelter and support to millions of pilgrims who turned to it for faith. This place has tremendous historical and biblical significance and importance for Christians worldwide. It was also blessed by numerous great churches and ancient Christian traditions. Altogether, these factors have made Vatican City an extraordinary place of Christian faith and devotion to God, hope, and love.

The History of Vatican City in Christianity

The Christian history of the Vatican began with St. Peter, one of the apostles of Jesus Christ. According to tradition, he came to Rome to spread the Gospel and became the first pope. He was martyred during the reign of the Roman Emperor Nero (about AD 64–67) and was buried on Vatican Hill.

His tomb became one of the most visited Christian sites by pilgrims. After Saint Peter died and was buried there, the first St. Peter’s Basilica built over his grave by Emperor Constantine in the fourth century because Christianity was declared an official religion by him.

Over centuries, the Popes have been able to make Vatican Hill the center of the Christian world. During the Renaissance, spectacular churches, museums, and monuments of Michelangelo, Raphael, and Bernini turned the Vatican into one of the world’s spiritual and cultural centers.
According to the Lateran Treaty of 1929, Vatican City is an independent state with the Pope as its head. This territory is the headquarters of the Roman Catholic Church.

The Spiritual Importance of Vatican City

For Christians, Vatican City is more than just a foreign state; it is a heavenly place where people experience love and faith every day. The Holy See is both the religious and political authority over the Vatican City State, an enclavesanctified by the Pope as the leader of the catholic world.
People from different parts of the world come to Vatican City to participate in and witness the events of Christian interest, such as Easter, Christmas, Holy Week, and other festive holidays. Every day, thousands of people attend the Pope’s Mass in St. Peter’s Basilica and St. Peter’s Square to pray and receive his blessing.


Furthermore, the Vatican promotes Christian values such as love, forgiveness, humility, mercy, peace, and charity. By living according to these principles and leading by example, the Holy See inspires people to have faith, follow the Lord’s teachings, and develop a personal relationship with God.

Vatican City Today

For today, Vatican City is the largest administrative and spiritual center of the Roman Catholic Church. Despite its small size (about 44 hectares or 110 acres), Vatican City is considered one of the Christian world’s cultural centers. It is home to many Christian heritage sites like St. Peter’s Basilica, the Sistine Chapel, and Vatican Museums.
The Pope resides here and leads the church through his spiritual guidance, authority, and service. Vatican City also has a post office, radio, TV, Swiss Guard, and other services that support the Pope in his work.
Moreover, millions of Christians come to Vatican City to participate in public masses, meet the Pope, and visit a holy place.

Interesting Facts About Vatican City

Teresting Facts About Vatican City Vatican City is the world’s smallest state. It is the religious center of the Roman Catholic Church Holy See. St. Peter’s tomb is said to be located in the basilica. The Pope is both the head of state and the spiritual leader of the Catholic faith. Vatican City became an independent nation-state in 1929. The Sistine Chapel is where popes are elected. The Swiss guards have served the Pope since 1506. Vatican City is considered to have the best Christian artistic and cultural heritage. Pilgrims come to Rome to pray and perform other religious duties. The Vatican is a UNESCO World Heritage Site.

Conclusion

Vatican City is one of the holiest places for Christianity, where thousands of people have been worshiping and believing for more than two thousand years. From Saint Peter till Pope, they spread the truth of faith and religiousness, making Vatican City an important holy place for all Christians. Thanks to its beauty, churches, and great power of religion and faith, this place has become the center of Christian world. This place remains holy for the representatives of different Christian traditions and the world’s nations, gathering millions of believers that pray to God and follow the Christian principles of love and hope.


🥪 High-Protein Breadless Paneer Sandwich for Weight Loss

(The Sandwich Layers Are Made with Paneer Too!)

This healthful sandwich is made from paneer rather than bread, making it an excellent source of protein, it’s an ideal choice for a diet plan.

Introduction

 This High Protein Breadless Paneer Sandwich is a great option for anybody who is trying to lose weight or avoid eating too many carbs. It uses crispy layers of paneer as bread instead of traditional bread. Paneer is also an excellent source of both protein and calcium, providing you with a substantial and nutritious meal in every bite! The sandwiches will fill you up with their tasty combination of paneer and cheese. Best of all, this recipe can be made in 20 minutes, and can be enjoyed any time of day – breakfast, lunch, or after workouts. For a complete and balanced meal that helps you meet your weight loss goals and still tastes fantastic, serve your sandwiches with a small salad or a mint yoghurt dip.

Ingredients (Makes 1 serving)

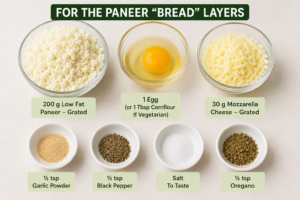
For the Paneer “Bread” Layers

  1. 200 g Low Fat Paneer-Grated
  2. 1 Egg (or 1 Tbsp Cornflour If Vegetarian)
  3. 30 g Mozzarella Cheese-Grated
  4. ½ tsp Garlic Powder
  5. ½ tsp Black Pepper
  6. Salt To Taste
  7. ½ tsp Oregano

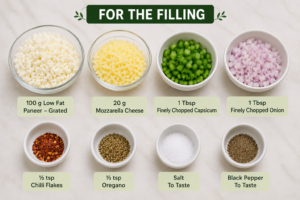
For The Filling

  1. 100 g Low Fat Paneer-Grated
  2. 20 g Mozzarella Cheese
  3. 1 Tbsp Finely Chopped Capsicum
  4. 1 Tbsp Finely Chopped Onion
  5. ½ tsp Chilli Flakes
  6. ½ tsp Oregano
  7. Salt And Black Pepper To Taste

For Cooking

  1. 1 tsp Olive Oil/Butter 

👩‍🍳 Step-by-Step Recipe

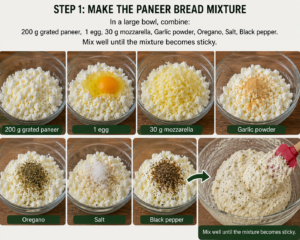
Step 1: Preparing Paneer Bread Mixture

Take a bowl and add the following ingredients into it:

  • 200 g paneer grated
  • 1 egg
  • 30 g mozzarella
  • Garlic powder
  • Oregano
  • Salt
  • Black pepper
  • Mix everything together until you get a sticky mixture.


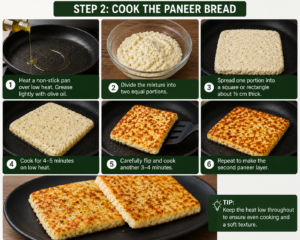
Step 2: Preparing Paneer Bread

  • Heat a non-stick pan on a low flame and grease it with some olive oil.
  • Now, make two equal parts of the mixture that you have prepared in Step 1.
  • Make a square or a rectangle out of one part with a thickness of ½ cm, and put it into the pan.
  • Let it be cooked for 45 minutes on a low flame.
  • Then, flip it and cook it for another 34 minutes.
  • Do the same thing with the other part to make another paneer layer.


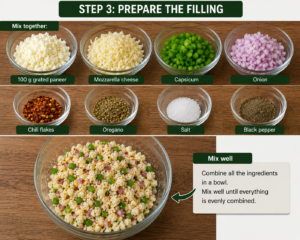
Step 3: Preparing Filling

Take another bowl and add the following ingredients into it:

  • 100 g paneer grated
  • Mozzarella cheese
  • Capsicum
  • Onion
  • Chili flakes
  • Oregano
  • Salt
  • Black pepper
  • Now, mix everything together.


Step 4: Preparing the Sandwich

  • Take one of the prepared layers and put it on a plate.
  • Then, put the mixture that you have prepared in Step 3 on it.
  • Now, put the other layer of paneer on top of the mixture.

Step 5: Finish Cooking the Sandwich

  • Now, return the sandwich to the pan and let it be cooked for 23 minutes on each side until the mozzarella is melted and the layers are slightly caramelized.

Step 6: Serve

  • Finally, cut the sandwich into two pieces and serve it warm with mint yogurt dip or fresh cucumber salad.

💪Why this recipe is healthy for weight loss

High in protein to help maintain muscles.

There is no bread and is much lower in carbs than a normal sandwich.

It will keep you feeling full after you eat it.

It has lots of calcium, and is filling enough to serve as a healthy breakfast, lunch, or dinner.

Tip:

To make it healthier, use low fat paneer and reduced fat mozzarella, and use spinach or finely chopped mushrooms as a filler to add more volume, while not adding many calories.

A Healthier Option That You Will Enjoy

This bread free paneer sandwich is a healthier option that fills you with protein, while satisfying your cravings for a sandwich. Using paneer in both the bread and the filler, you will enjoy every bite of this high protein and healthy sandwich. Pair it with a salad for a healthy, filling, and delicious meal.


🌼 Refreshing Chamomile Wellness Drink (Juice-Style)

Introduction

This light and refreshing drink made with chamomile tea, fresh lemon juice, cucumber, and mint is the perfect choice for hot summer days. It is low in calories while providing an abundance of hydration and has many health benefits that can help you achieve a healthy weight loss.

🛒 Ingredients (2 Servings):

  • 2 chamomile tea bags or 2 tablespoons of chamomile flowers
  • 2 cups (500 ml) hot water
  • ½ cucumber, chopped
  • The juice of 1 lemon
  • 8–10 fresh mint leaves
  • 1 teaspoon honey
  • Ice cubes
  • Lemon and mint slices for garnish

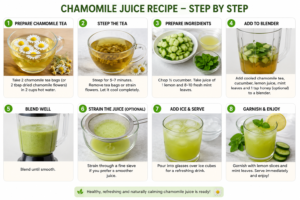
👩‍🍳 How to Prepare Chamomile Lemonade

Step 1: Steep the chamomile tea bags or the flowers in the boiling water for 57 minutes. Then, let it cool down

Step 2: Blend the cooled down chamomile tea, cucumber, lemon juice, mint leaves, and honey with ice cubes until you get a smooth consistency.

Step 3: If desired, you can also sieve the mixture for a smoother texture.

Step 4: Divide the mixture into two glasses filled with ice cubes and garnish with lemon slices, fresh mint leaves, and serve chilled.

💚 Benefits:

  • Light and refreshing
  • Hydrating
  • Contains no caffeine
  • Loaded with antioxidants
  • Calorie-free alternative to sweetened beverages

Conclusion

This healthy and delicious chamomile lemonade is a perfect addition to your summer weight loss diet. It is light, refreshing, and provides an abundance of hydration. You can enjoy this delicious drink with every meal or have it as a snack to feel satisfied for a long time. Add it to your healthy eating habits and an active lifestyle to achieve healthy weight loss.


Kamakhya Temple: The Sacred Shakti Peetha of Assam – History, Spiritual Significance, and Travel Guide

Discover the Divine Power of Kamakhya Temple

The Kamakhya Temple is one of the holiest places of pilgrimage for Hindus in India and is located on the lovely Nilachal Hill in Guwahati in Assam. This ancient temple is dedicated to Goddess Kamakhya, a powerful form of Goddess Shakti and it attracts millions of devotees, spiritual seekers and tourists every year.

The Kamakhya Temple, unlike most Hindu temples, celebrates the divine power of fertility, femininity, creation and motherhood. The temple does not have a regular form of the idol of the goddess. Instead, devotees worship a naturally formed stone, which symbolizes the feminine creative energy, making it one of the most unique temples in the world.

If you are seeking spiritual peace, interested in ancient Indian history or planning a pilgrimage in Northeast India, Kamakhya Temple provides an unforgettable experience of devotion, mystery and centuries old traditions.

A Hindu priest reading scriptures at the Kamakhya Temple in Guwahati, Assam, India.

History of Kamakhya Temple

The history of Kamakhya traces back to more than a millennium. Many historians and archaeologists believe that the worship of this deity predates recorded history. According to the legends, the first ever king of Pragjyotishpur, Narakasura, was one of the first rulers to offer his prayers to goddess Kamakhya. The original structure suffered from centuries of war and natural disasters.

The current structure of the temple was built by the Ahom prince Naranarayana and his brother Chilarai in the sixteenth century AD. Since then, Kamakhya has remained one of the significant seats of Shakti. The architectural style of the temple is a harmonious blend of traditional North Indian temples and local Assamese styles. This shrine possesses a unique dome-shaped roof, intricate carvings of deities on stone, and various other sculptures that enhance the beauty of the structure.

Mythology behind Kamakhya Temple

Most of the origin stories of Kamakhya temple are associated with Goddess Sati and Lord Shiva. According to Hindu mythology, Goddess Sati, wife of Lord Shiva, immolated herself in the fire of King Daksha’s yajna out of anger and dishonor. Lord Shiva, in the form of Tandava, pierced his chest with his own spear, creating 51 Shakti Peethas across the nation. It is believed that the yoni of Goddess Sati fell on the Nilachal Hill, manifesting her divine feminine power. Hence, Lord Shiva built this shrine to honor her contribution to the creation of the universe.

This is why Kamakhya has been regarded as one of the holiest Shakti Peethas since ancient times. The divine powers of this goddess have been worshiped and revered throughout history.

Explore the intricate architecture of Kamakhya Temple, a sacred site in Assam, India, with its iconic dome and ornate details.

Spiritual Significance of Kamakhya Temple

Kamakhya holds special significance, not only for the people of Assam but across the country. While many temples were created to appease the wrath of gods or to fulfill a wish, Kamakhya is all about seeking the pleasure of the goddess. Devotees seek blessings from the deity for:

  • Health and prosperity
  • Fertility and children
  • Happy married life
  • Family welfare
  • Spiritual upliftment
  • Inner peace and strength

Kamakhya is also one of the most prominent Tantric seats, which is why many saints and sadhus visit the shrine to strengthen their Tantra practice.

Moreover, visiting Kamakhya feels like experiencing a deeply spiritual part of Hindu traditions. Most of the visitors, including sadhus, leave the shrine feeling blissful and closer to the divine feminine force.

 The Unique Sanctum in Kamakhya Temple

As mentioned above, the deity of Kamakhya is not depicted in human form and is not carved out of wood or stone. There is no idol of goddess inside the sanctum. Instead, there is a narrow staircase leading to a small chamber with a natural fissure on the rock. The continuous stream of water coming out of the fissure is believed to be the source of power that nourishes the entire universe. The ambiance created by the continuous flow of water adds to the mystery and sacredness of this holy place.

The Ambubachi Mela, Kamakhya Temple’s Most Celebrated Festival

The most popular festival of Kamakhya is Ambubachi Mela. This three-day-long event is held every year in June. Legend has it that the goddess menstruates for three days a year, and the temple is closed during this time. The faithful believe that the cloth offered to the deity during this period is pure and helps cure all diseases. Hence, the goddess is worshiped as the giver of life and death. Saints and sadhus from across the country visit the shrine during this period to experience the unique energy of the goddess.

Architecture of Kamakhya Temple

The architectural brilliance of Kamakhya temple has attracted the attention of thousands of art lovers from around the globe. Some of its prominent features include:

  • Beautiful beehive-shaped domes
  • Stone-carved images of Hindu deities
  • Sculptures of celestial musicians
  • A large courtyard with pillars
  • Ancient staircases
  • Intricate engravings on the toranas
  • Small shrines depicting various forms of goddess Shakti
  • Moreover, the temple complex also accommodates the shrines of the Ten Mahavidyas, making it a must-visit destination for all Shakti devotees.

When to Visit Kamakhya Temple

You can visit Kamakhya temple any time of the year because it is open throughout the year. 

However, the best time to explore this ancient shrine is from October to March when the weather is comparatively cool and comfortable. April and May can also be a good time to visit Kamakhya temple. June is an excellent month for those who wish to witness the spectacular Ambubachi Mela that is held every year in the first week of June.

 During the rainy season, Nilachal Hill appears in its greenest form, creating a spectacular view.

How to reach Kamakhya Temple

Reaching Kamakhya temple is not difficult at all because it is one of the most visited shrines in the entire state. If you are planning to visit Kamakhya, here are some of the best ways to reach there:

  • By Air – Lokpriya Gopinath Bordoloi International Airport is located around 20 km from Kamakhya temple. You can hire a taxi or even use app-based cab services.
  • By Train – Kamakhya railway station is one of the nearest railway stations linked to the city of Guwahati. You can take a train from there to reach the shrine.
  • By Road – There are plenty of buses and taxis available in Guwahati to reach Nilachal Hill.

You can also cover all the places in Guwahati on your way to Kamakhya temple. There are various attractions in and around Guwahati that you can explore after visiting Kamakhya temple and return to the city via bus or taxi.

Other Places Near Kamakhya Temple

After visiting Kamakhya, you can explore some of the best places around Guwahati:

  • Umananda Temple
  • Assam State Museum
  • River cruise on Brahmaputra River
  • Pobitora Wildlife Sanctuary
  • Basistha Ashram
  • Srimanta Sankardev Kalakshetra
  • Fancy Bazaar
  • Guwahati Planetarium

All these places are worth a visit and will give you a unique experience of visiting Assam.

Tips for First-time Visitors

If you are a first-time visitor, here are some tips to help you have a great experience at Kamakhya temple:

  • Wear appropriate dress code.
  • Take off your slippers before entering the temple.
  • Take care to stay hydrated, especially during the hot summer months.
  • It is better to reach early in the morning to avoid the crowds.
  • Always follow the rules and regulations of the shrine and avoid clicking pictures if it is prohibited.
  • Do not litter or leave any garbage at the temple.

If you are in your old age, it will be better to use the transport facility while climbing down/up the Nilachal Hill.

Final Thoughts

Kamakhya is one of the most sought-after destinations among Indian pilgrims. Not only this, but many spiritual seekers, history buffs, and even tourists visit this shrine every year. This article will help you understand the rich history, unparalleled significance, and architectural brilliance of the Kamakhya temple. The enchanting beauty of the Nilachal Hill and the powerful divine feminine energy of goddess Kamakhya will leave you mesmerized.


Healthy Stuffed Pomfret (Pompano) Masala Fish Recipe

High-Protein | Healthy | Fat Loss Friendly

This healthy and tasty stuffed pomfret fish recipe is made with freshly roasted masala and healthy fats such as virgin coconut oil or desi ghee. With lots of protein and no carbs, this dish will be the best addition to your healthy weight loss or fitness diet plan.

Deliciously grilled pomfret served with onions, coleslaw, and green sauce on a black plate.

Preparation Time 

  • Prep Time:20 min
  • Cook time:1520 min
  • Total time:35-40 min
  • Servings: 2

Ingredients

For the fish

  1. 2 whole pomfret (pompano) fish, cleaned
  2. Salt to taste
  3. ½ tsp turmeric powder
  4. 1 tsp red chili powder


For the homemade masala

  1. 2 tbsp coriander seeds (sabut dhania)
  2. 1 tsp cumin seeds (jeera)
  3. 810 garlic cloves
  4. 1 inch ginger
  5. 1 big onion
  6. 1 small cinnamon stick
  7. 45 cloves
  8. 810 black peppercorns
  9. 8-10 Kashmiri red chilies, soaked in a little warm sugar water for 15 min
  10. 16 ml vinegar
  11. Salt to taste
  12. ½ tsp turmeric powder
  13. ½ tsp red chili powder


For frying

  1. 23 tbsp desi ghee or virgin coconut oil

Instructions

Step 1: Prepare the fish

  • Wash the pomfret fish in running water.
  • Pat dry with a kitchen towel.
  • Make a slit in the center of the fish.
  • Remove the backbone as well as large bones, leaving the thin ones.
  • Make a few cuts on both sides so that the masala can get in.

Step 2: Marinate the fish

  • Sprinkle salt on both sides of the fish. Add some turmeric powder. Sprinkle some red chili powder.
  • Apply the salt and spices on both sides of the fish.
  • Marinate it for 20-30 min.

Step 3: Prepare the homemade masala

  • Dry roast coriander seeds till they become fragrant. 
  • Add cumin seeds, and dry roast for a few sec.
  • Roast garlic and ginger.
  • Roast onion till tender and a bit charred.
  • Add cinnamon, cloves, and black peppercorns, Roast for 30-40 sec.
  • Now grind all the roasted masala ingredients in a blender.
  •  Add the chopped Kashmiri chilies that have been soaked in sugar water.
  • Also add 16 ml vinegar, salt, turmeric, and red chili powder.
  •  Grind to make a thick masala paste.

Step 4: Stuff the fish

  • Open the slit in the marinated fish. 
  • stuff it generously with the masala prepared above.
  • Also fill the cuts made on the fish with the masala. 
  • Press the stuffing to make it firm.
  • Let it rest for another 10 min.

Step 5: Shallow Fry the fish

  • Heat oil in a heavy bottomed pan on medium flame.
  • Gently place the stuffed fish in the hot oil. 
  • Fry for 5-7 min on one side.
  • Now turn it over with a wide spatula and fry for another 5-7 min on the other side.
  • Keep frying till the fish is cooked through and the masala is aromatic.

Step 6: Serve

  • Remove the fried fish from the pan and transfer it to a serving plate.


You can serve it with lemon wedges, onions, cucumber salad, mint chutney, steamed veggies or green salad.

Healthy Tips

  • Use virgin coconut oil or desi ghee while preparing this dish. 
  • Avoid using cheap edible oil.
  • Do not deep-fry the fish to keep the dish healthy and low in calories.
  • Always use freshly roasted masala instead of store-bought readymade masala.
  •  This way, you can have control over the health benefits and flavor of your dish.
  • Instead of having rice with your fish, try having veggies to reduce the carb content so that the dish becomes more suitable for fat loss.
  • This healthy stuffed pomfret recipe is high in protein and healthy fats and low in carbs. 


Vibrant dish of spicy grilled fish topped with vegetables served alongside fresh greens and soup.

Enjoy this flavorful dish without worrying about weight gain as it is a perfect fit for healthy eating.


Healthy High-Protein Pizza for Weight Loss

🍕 Introduction

Bet you thought pizza was offlimits when trimming down. Surprise – this version brings high-protein goodness without skipping flavor. Not only does it swap white flour for eggs and psyllium husk, but also builds a tender base rich in protein, light on carbs. Picture bright chunks of bell pepper dancing across the top. Add smoky tandoori paneer, let melty mozzarella weave through. Each mouthful feeds your body well while feeling like a treat. Who knew eating clean could taste this good. Baking your own pizza at home might be just what you need if losing weight matters to you. This version works well when protein intake is a priority too. It satisfies cravings without weighing you down later. The flavors come together fast, yet nothing feels rushed. Ready before half an hour passes, each bite holds its promise. A few ingredients make the difference here.

Pizza That Fits Your Weight Loss Goals

  • Packed with protein thanks to eggs along with paneer, helping keep muscles strong. Muscle upkeep gets a boost from these two main ingredients working together.
  • Bursting with fiber thanks to psyllium husk, otherwise known as isabgol – keeps hunger at bay by stretching that satisfied feeling. Fullness lingers because of how this ingredient slows digestion down.
  • Bursting with bright veggies that bring nutrients, defense helpers, a rainbow on your plate. Fresh picks fuel the body, hand by hand they add up to strong days. Each bite carries quiet power from greens, yellows, redsnature’s mix without fuss.
  • Baked less crisp, this version skips the white flour crunch. Instead of typical crusts, it uses grains that stay closer to their natural form. Fewer processed carbs make a difference here compared to classic pies.
  • One bite won’t derail your goalsif you keep the amount in check. This choice brings fullness without packing excess calories. Think of it as a quieter flavor that still satisfies. Portion size matters more than frequency here. It fits well alongside other whole foods. A small plate leaves room for movement later. Energy balance shifts slowly, not overnight.

Ingredients

For the Pizza Base

  • 2 eggs
  • Two tablespoons of psyllium husk, also known as isabgol
  • ½ tsp Kitchen King masala
  • ¼ tsp garam masala
  • ¼ tsp red chilli powder
  • Salt to taste
  • 2 tbsp butter

For the Toppings

  • Red bell pepper (diced)
  • Yellow bell pepper (diced)
  • Green bell pepper (diced)
  • A single small onion, cut into tiny pieces
  • Grated mozzarella cheese (moderate amount)
  • Weight-loss ketchup
  • Italian seasoning
  • Pizza seasoning

For the Tandoori Paneer

  • 150–200 g paneer (room temperature)
  • 1–2 tsp tandoori masala
  • 2–3 tbsp desi ghee

Step 1:Prepare the pizza base

Two eggs go into a bowl. Alongside them, toss in some psyllium husk, Kitchen King masala, garam masala, red chilli powder, plus a pinch of salt. Stir everything togetherkeep going one full minute at least, maybe two, till it turns even and just thick enough. Wait right there, leave it sitting for three minutes flat while the psyllium pulls in liquid.

Step 2:Cook the Pizza Base

Start by warming a non-stick pan on low-medium heat, then add two spoons of butter to melt slowly. Once ready, tip the mixture into the center so it flows outward like a flat circle. A lid goes on top nowlet it sit four or five minutes while the bottom firms up. Turn it gently after that time has passed; keep going for two more minutes at least. Move it off the stove when done, leave it waiting nearby.

Step 3:Prepare the vegetable toppings

Melt some butter in a skillet over medium heat. Toss in chopped red, yellow, and green peppers together with onion pieces. Cook them for two or three minutes – just enough to soften a bit while keeping their crunch. Sprinkle in a little salt followed by a touch of Italian herbs near the end.

Step 4:Cheese cooked in tandoor spices

Start by dicing the paneer into small cubes you can eat in one go. Sprinkle tandoori masala all over, making sure every piece gets coveredleave it sitting for around 10 to 20 minutes. Warm some desi ghee on a flat skillet, toss in the pieces, then fry slowly till each side turns crisp and golden.

Step 5:Pizza Assembly Complete

A smear of slimming ketchup goes first on the warm crust. Over that, a dusting of shredded mozzarella settles lightly. Sautéed veggies scatter next, spread without crowding. After them come cubes of tandoori paneer, placed one by one. Another whisper of cheese floats on top. Herbs land last – Italian blend meets pizza spice in small pinches.

 Step 6:Bake Or Melt The Cheese

Start by warming the oven to 180 degrees Celsius, which is about 356 Fahrenheit. The pizza needs around five to seven minutes inside, just long enough for the cheese to turn soft and take on a faint gold tint. Without access to an oven, try using a flat griddle insteadset the pizza down, trap the heat with a lid overhead, then let it sit under gentle warmth until every bit of cheese gives way into meltiness.

🍽️ Serving Suggestion

Start by cutting the pie into pieces, then enjoy it warm alongside a crisp green salad – pairing it with a light yogurt dip boosts the protein. A meal like this fills you up without weighing you down.


Final Thoughts

Who says you have to skip treats to eat well. A slice of this High-Protein Pizza brings flavor, fullness, and good nutrition togetherideal when hunger hits but balance matters. Made without hassle, it loads in protein and veggies so meals stay tasty yet aligned with how you aim to feel. Taste isn’t lost here, just reshaped quietly into something kinder.